Can you cut LED strip lights?
LED strip lights are renowned for being an impactful, no-hassle light source. Their diodes pack an affordable punch and can help transform your home from dimly lit to twinkling.
But many people wonder, can you cut LED strip lights? Well, the simple answer is: yes! LED strip lights can easily be cut to fit the length of your walls, tables, and cabinets. No two surfaces are the same, and you might need LED strip lights of differing lengths to decorate your home.
Work with Light Supplier as we take you through the strip light-altering process. We’ll tell you where you should cut them, how to cut them and how to join them together.
Where do I cut an LED strip light?
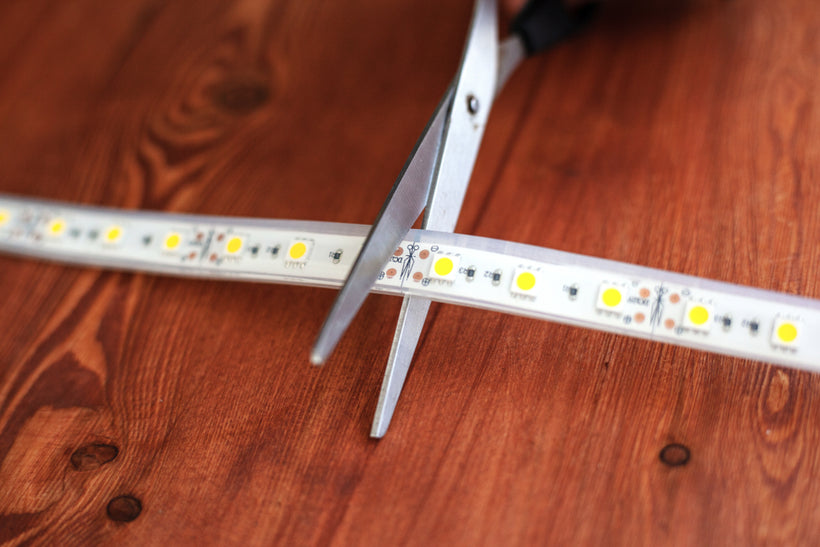
LED strip lights have a designated cut point where you can cut the strip without damaging it. You can find the cut point on the strip light by looking for a line with a scissors icon printed on it. Make sure to cut the LED strip light at this point to ensure it still works properly.
Will an LED strip light still work if you cut it?
An LED strip light will still work if you cut it, so long as you cut it at the designated cut point. If you cut the strip light at a random point, it may not work properly, and you could damage the strip light altogether.
How do you cut LED strip lights?
Cutting LED strip lights is a simple process, but following the correct steps is essential to ensure the strip light works properly.
1. Measure the strips
Before cutting, measure where you want to place your LED strip lights. Then, measure the length of your LED strip lights to see where you’ll be cutting. Use a tape measure, and grab a piece of paper to jot down your measurements.
2. Find the scissors logo
Locate where the scissors logo is on your LED strip lights: this will indicate where you can cut the strip light without damaging it.
3. Cut the strip with a pair of scissors
Grab a pair of scissors and cut the strip light along the designated cut point. Make sure to cut the strip light straight to ensure it fits properly!
How do you join LED strip lights?
Once you’ve cut your LED strip lights, you might need to join them together. Another amazing thing about strip lights is that they can be cut and combined with connectors to create customised lengths.
If you need to join your strip lights to accommodate a larger space, never fear! Here’s how to combine LED strip lights:
1. Measure and cut strips to size
Before cutting your lights, preparation is key! If you plan on installing them around the perimeter of your lounge or bedroom, measure the length of your four walls and add all the numbers together: you can use a Perimeter Calculator to help you out.
Then, ensure you’ve got enough LED strip lights to go around! We recommend our range of Linkable LED Strip Lights or our Cut To Size LED Flexible Tape for maximum personalisation.
To guarantee you’ve got enough, we suggest purchasing a length longer than needed to accommodate any errors. Then, grab your scissors and cut along the dotted copper line.
2. Find your required connector
There are two main types of LED strip light connectors: Gapless Connectors, which are excellent for straight walls and Jumper Cord Connectors, which allow LED strip lights to be attached to a surface at an angle (e.g., the corner of a kitchen cabinet).
3. Attach your connectors
Once you have your connectors, peel off their adhesive covering. Ensure that they are the right way around, and use the clamps attached to the connectors to secure the strip lights into place.
4. Plug in your LED strip lights
To check if your handiwork has been successful, plug in your LED strip light and flick the switch! If they are not lighting up as they should, see if the polarities are correct.
How do I use LED strip lights after cutting and joining?
Now that you’ve cut and joined your LED strip lights, you’ve successfully prepared them for application! So, what’s next?
1. Clean your surface
No matter where you place your LED strip lights, you should always clean the area with a wet cloth to remove dust or dirt. Remember to dry it thoroughly before applying your strip lights; otherwise, the adhesive may be ineffective.
2. Peel off the adhesive and apply it to the surface
Carefully remove the sticker that covers your adhesive surface and paste the strip light into the desired position.
3. Plug in your LED strip lights!
Now, all that’s left to do is admire all your hard work! Plug in your LED strip lights and watch your room transform into an ambient oasis.
Shop with Light Supplier for Premium LED Light Strips!
If you have yet to purchase your LED Strip Lights, save this guide so you can return to it! Feel free to browse Light Supplier’s carefully curated selection of LED Strip Lighting manufactured using durable, first-rate materials.
We know every home is different: whether your renovation requires Linkable LED Strip Lights, Flexible LED Strip Lights, or Cut To Size LED Strip Lights, the Light Supplier product range won’t be beaten on quality.